 Lago Vista Technologies
AWS Network Setup
This document outlines a network solution for a medium-sized enterprise with the following requirements:
- Separation and parity between development, testing, and production environments.
- Segmentation of trusted (not internet-accessible) and untrusted (internet-accessible) resources.
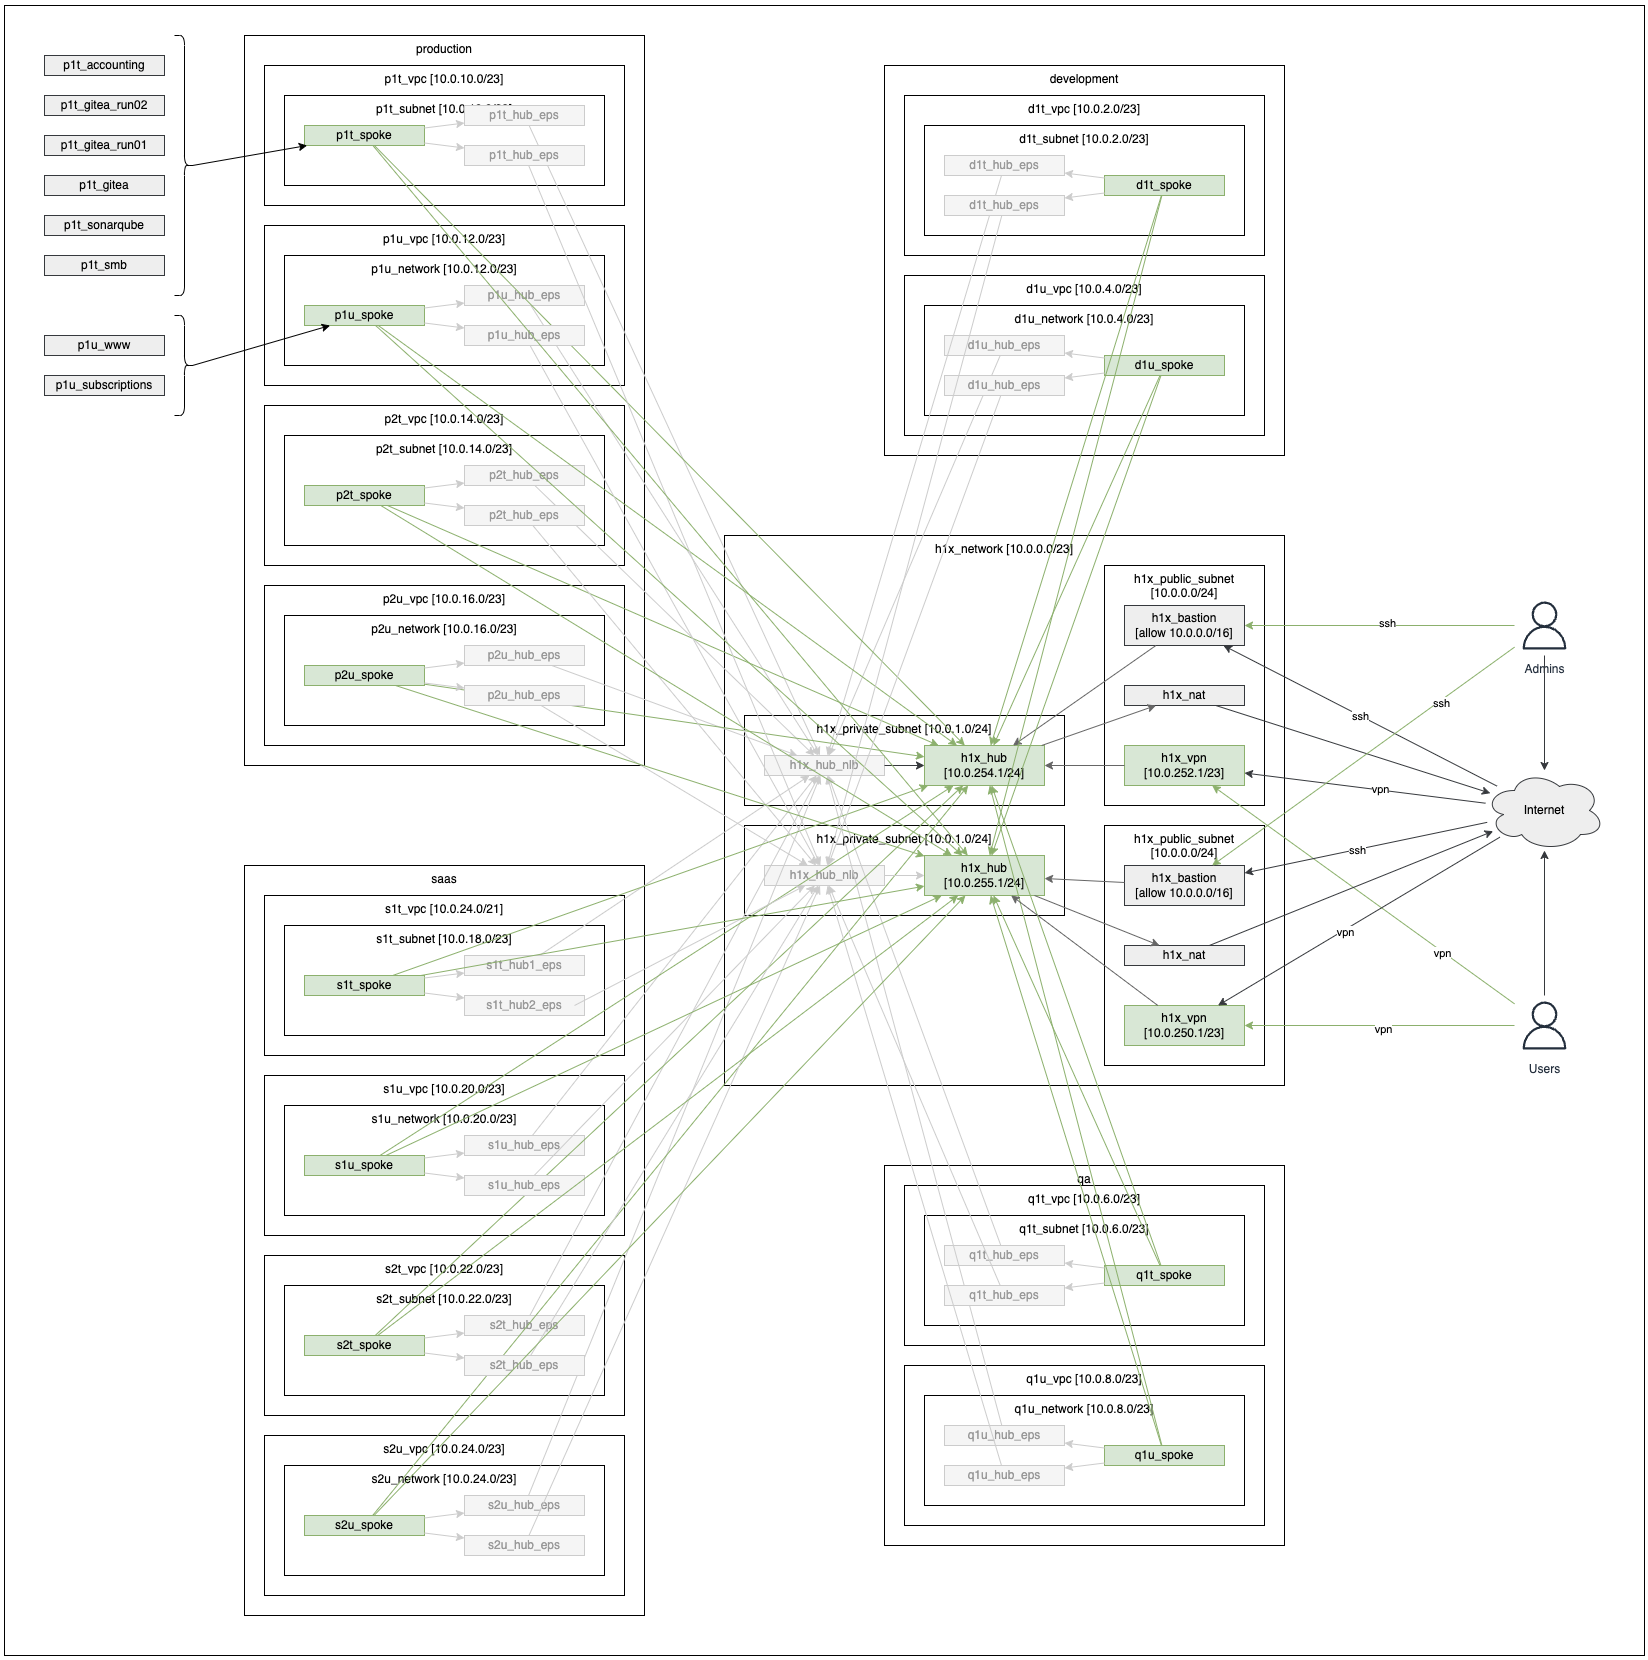
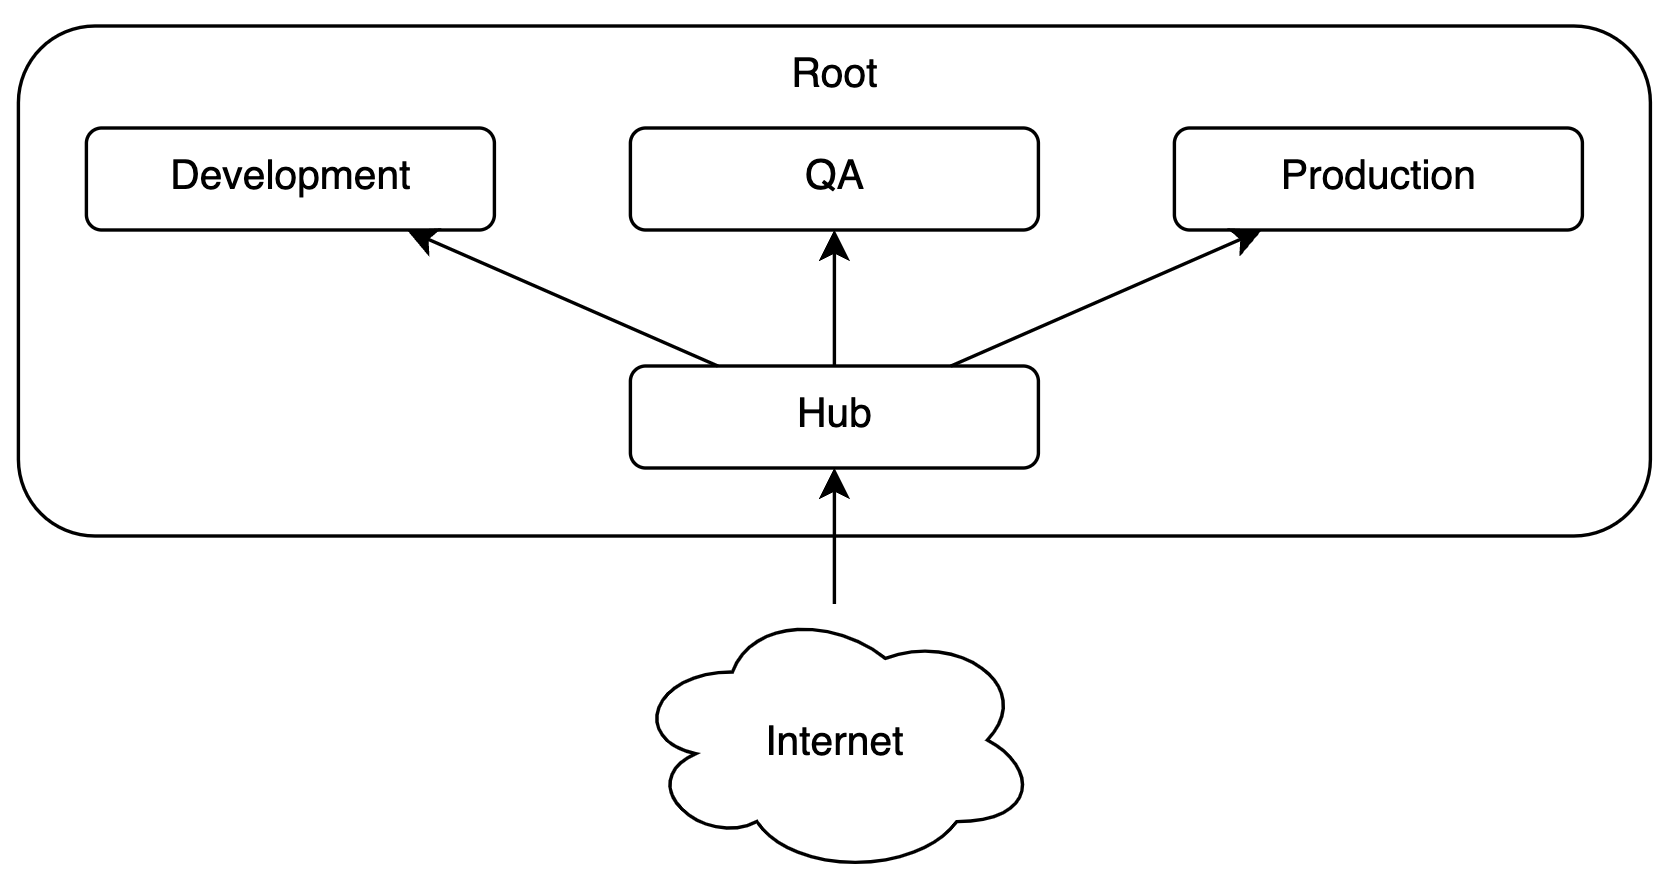
- Hub-and-spoke architecture for efficient connectivity.
- Minimal costs to maintain affordability.
To address costs (#4), using EC2 instances offers the lowest entry cost. Instead of using the AWS NAT Gateway (which costs about $40/month), we use a minimal EC2 instance running Linux as our NAT, reducing the cost to $4/month.
For the hub-and-spoke model, AWS Transit Gateway is the default advertised solution. However, it incurs a $35/month charge for the hub, plus $15/month per spoke or isolated network segment. For our design, this totals $120/month.
Instead, we use EC2 instances and SSH tunnels to create routable connections between segments. Each segment is in a separate VPC, connected through a Private Endpoint Service shared in the hub. This approach costs $15/month for the VPC Endpoint Service and $4/month per segment, totaling approximately $45/month.
The tradeoff is a higher technical complexity, which we aim to solve in this guide.
1. Network Architecture
Our network is divided into the following segments:
- Development (d) – For development and proof of concepts.
- QA / Testing (q) – For testing stable production candidates.
- Production (p) – For widely used systems requiring persistence.
For Production and possibly QA, we further divide into:
- Primary (1) – The main region closest to the user base.
- Secondary (2) – A backup region for disaster recovery.
Each of these segments is further split into:
- Trusted (t) – Resources with no direct internet exposure.
- Untrusted (u) – Resources with internet-exposed traffic.
2. AWS Setup
2.1. Multi-Account Setup
First, we set up AWS accounts using a multi-account strategy. This approach provides:
- Destructible accounts – Easily reset or removed.
- Isolated billing – Costs are segregated per account.
- Security barriers – Stronger separation between environments.
Refer to AWS best practices for multi-account management:
AWS enforces limits on accounts and sub-accounts, so consider common separation strategies:
- Business Unit – Separate costs per unit.
- Subsidiary – Isolate expenses per entity.
- Environments (Dev/QA/Prod) – Reduce blast radius and control costs.
- Application – Allows selective decommissioning of apps.
For this project, we create an account per environment, resulting in:
- AWS Root Account – The initial account, referred to as "root."
- Development Sub-Account – For exploration and development.
- QA Sub-Account – For testing production candidates.
- Production Sub-Account – For workloads requiring high stability.
- Hub Account – Centralizes network control for the hub-and-spoke model.
2.2. Root Account Setup
Enable Multi-Factor Authentication (MFA) for all users:
- https://docs.aws.amazon.com/IAM/latest/UserGuide/enable-virt-mfa-for-root.html
- https://docs.aws.amazon.com/IAM/latest/UserGuide/enable-mfa-for-root.html
After securing the root account with MFA, proceed with creating sub-accounts:
- https://docs.aws.amazon.com/organizations/latest/userguide/orgs_manage_accounts.html
- https://docs.aws.amazon.com/organizations/latest/userguide/orgs_manage_accounts_create.html
Once sub-accounts are created, configure IAM Identity Center for user access management:
Refer to "One place to assign permissions to multiple AWS accounts" for centralized permission management.
2.3. Account Structure
We'll create multiple AWS accounts and VPCs:
Ensure that your primary user account has access to all sub-accounts.
We should have the following accounts:
- root
- development
- qa
- production
- hub
- test_network
- test_development
- test_qa
- test_production
- test_hub
The test accounts will be used to test changes to the network before deploying into the production network.
2.3.1. IAM Identity Center
Setup IAM Identity Center in the same region as you'r primary production VPC's will be. Create your user and setup MFA. Create a group "administrators" and add you user.
In "IAM Identity Center", on the left under "Multi-account permissions", select "Permission sets". Click "create permission set" in the top right. Use a predefined permissions set "AdministratorAccess". Name the permission set "administrator_permissions" and create the permission set.
In "IAM Identity Center" on the left is "Multi-account permissions" - select "AWS accounts" under that. Select the accounts and then click "Assign users or groups" button in the top right. Select the "administrators" group and click next. Select the "administrator_permissions" permission set and click next. Submit the request.
Once done, you can log into the AWS portal and you should see the accounts listed there.
2.3.2. Automation Accounts
Log into each account and create automation accounts for use in CI/CD pipelines.
Log into the AWS account. Go to "IAM" and then "Users" on the left. Create a user named "automation_user". On set permissions, attach "AdministratorAccess" policies directly. Create the user. Go back to "IAM" then "Users" on the left and select the "automation_user" to edit it. Go to the "Security credentials" tab and under "Access keys" click the "Create access key" button. The use case and description do not matter as much as possessing the key - the key is everything - protect it.
We'll need to configure two "aws.crendtials" files using the following template:
[network_automation_user]
aws_access_key_id=********************
aws_secret_access_key=****************************************

[development_automation_user]
aws_access_key_id=********************
aws_secret_access_key=****************************************

[qa_automation_user]
aws_access_key_id=********************
aws_secret_access_key=****************************************

[production_automation_user]
aws_access_key_id=********************
aws_secret_access_key=****************************************

[hub_automation_user]
aws_access_key_id=********************
aws_secret_access_key=****************************************
You'll want to update the environment scripts to point to those files. Do not include those files in the repository. The environment files are:
- .github/scripts/env_prod.sh
- .github/scripts/env_test.sh
3. Configurations
Configuring the AWS Network project will require the modification of:
./.github/scripts/env_prod.sh
- artifact bucket name
- state GUID
./.github/scripts/env_test.sh
./.github/scripts/env.sh
./nuke/*.yaml
- aws account numbers
$HOME/Projects/gitea/infotech/documents/aws-shawnzernik/gitea-token.md
$HOME/Projects/gitea/infotech/documents/aws-shawnzernik/aws.test.credentials
terraform/values.prod.tfvars
terraform/values.test.tfvars
3.1. Root DNS Setup
The network account is used to manage the root level DNS for your domain name. You'll need to configure the "root zone" in the "network" account and set the "dns_root" variable to it:
- terraform/values.prod.tfvars
- terraform/values.test.tfvars
Make sure to set both the "dns_root" and "dns_root_zone_id".
Also make sure to set the IP address of the NAT. This will have to be done after install deployment so you can determine the IP address. Update the vars file with the NAT's address and apply the Terraform a second time.
3.2. Gitea Setup
You'll need to setup the Gitea environment variables:
- $HOME/gitea-creds.sh
The file should look like:
export USER="**********************"
export PASS="**********"
Make sure this is the Gitea administrator and password. You can now run .github/scripts/gitea-setup.sh. This will setup the secrets needed in Gitea.
At this point, you should be able to run the pipeline in Gitea. For deployment, before Gitea is running, we'll use the command line.
4. Deployment
Change to the root directory of the repository. There should be a ".git" folder there. Run the following command:
source .github/scripts/env.sh
source .github/scripts/env_test.sh
bash $GITHUB_WORKSPACE/.github/workflows/build.sh
bash $GITHUB_WORKSPACE/.github/workflows/deploy_secrets.sh
bash $GITHUB_WORKSPACE/.github/workflows/deploy_tf.sh
This will boot up a 'test' network using the test accounts. Once this is done, you should be able to remote into the individual machines and 'ping' around.
4.1. Testing
Edit the terraform/test-vms.tf file and uncomment all the machines. You'll then redeploy to have Terraform create the VMs. After creating the VMs, use the following command to configure SSH.
cd .github/scripts
bash ssh_config.sh